Use this walkthrough guide to survive and defeat the undead in Into the Dead: Our Darkest Days with Penny’s strategies.
Penny Walkthrough
Struggling to survive the zombie apocalypse? Whether you’re constantly running out of resources or losing survivors, this comprehensive survival guide—led by the reliable Penny—will walk you through the best strategies to thrive, adapt, and escape.
Top 10 Survival Tips
Short on time? These are the must-know tips, ordered from early to late game.
- Pick Daphne & Penny Combo

- Daphne: Her Good Cook ability maximizes food yield early and scales well into the late game.
- Penny: While she risks negative states when injured, stealthy scouting reduces this risk. Her presence becomes invaluable with the right playstyle.
- Use Telescopes to Unlock New Areas
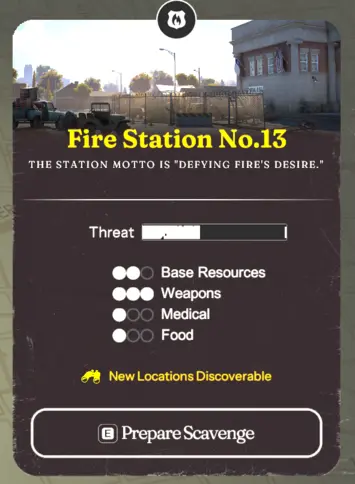
- Climb up to telescopes in areas marked with “New Locations Discoverable.”
- Expanding the map gives access to better loot, safer shelters, and strategic options.
- Three-Phase Exploration: Scout → Clear → Haul
- Scout: Use stealth-focused survivors and tools like lockpicks. Open shortcuts, disable threats quietly.
- Clear: Bring tankier characters with durable weapons to eliminate enemies and secure loot paths.
- Haul: Use high-capacity survivors to collect missed resources once the area is safe.
- Find a Secondary Shelter Early
- Zombie attacks increase over time. Relocating resets damage to barricades.
- Move shelters when damage per attack reaches 2, and always switch before it hits 3.
- Loot Wisely: Dismantle Items First
- Prioritize items that can be dismantled for high material yield.
- Water and Metal are essential for upgrades and survival.
- Stealth weapons are always a priority over loud ones.
- Optimal Upgrade Path
- Cooking Area (maximize early)
- Dismantling Bench
- Workbench (as needed)
- Portable Beds & Communal Areas (scale with survivors)
- Barricades (as you settle in)
- Weapons Bench
- Medical Area
- Remaining stations
- Ideal Survivor Count: 4–5
- Balance crafting and scavenging.
- Don’t hesitate to sacrifice a survivor to lighten the load if supplies are strained.
- Best Recruits
- Choose survivors who boost crafting efficiency.
- Joe is a standout: increased backpack slots and extra dismantling materials.
- Leave Alive, Not Empty-Handed
- Prioritize survival over full inventory.
- Revisit areas with better prep rather than risking your team.
- Stealth Over Strength
- Noise triggers zombie spawns. Stay quiet unless absolutely necessary.
- Use bottles to distract zombies for safer stealth kills.
Terminology & Zombie Types
Understanding how zombies behave is key to survival.
Active vs. Inactive Zombies
- Active: Patrol or block paths. Must be avoided or neutralized.
- Inactive: Stationary in the background. Only activate with noise or line of sight.
Weapon Classifications by Noise
- Stealth (≤30% noise): Glass bottles, scalpels, etc. One-hit but fragile.
- Medium (30–50%): Quiet enough for sneak attacks, more durable.
- Loud (>50%): High-damage and durability; alerts zombies across rooms.
Game Mechanics
Sound Detection Breakdown
- Sneaking: Silent unless directly seen.
- Walking: Can alert nearby zombies through doors.
- Running: Constantly broadcasts your location—use cautiously.

Stealth Kill Rules
- Avoid stealth takedowns near inactive zombies unless distance is safe.
- Medium and loud weapons can also be used stealthily in controlled conditions.
Doors & Stairs
- Doors contain noise but don’t block visual detection.
- Stairs offer hiding—zombies can’t detect you unless you step out.

Hiding Spots
- One-Sided: Only conceal you from one direction.
- Two-Sided: Offer full visual protection from patrolling enemies.
Early Game Strategy
Food First, Weapons Later
- Conserve raw materials by eating found snacks.
- Save meat and veggies for Cooking Area upgrades.
Weapon Preservation
- Avoid unnecessary fights early.
- Bypass zombies using hiding spots when possible.
Shelter Swapping
- Cycle through shelters to avoid high damage attacks.
- New shelters start with barricades—use this to delay crafting.
Planning Escape Routes
- Follow your escape route gradually.
- Only pursue high-risk zones when well-equipped.
Mid Game Tips
Efficient Resource Management
- Always stockpile stealth weapons—they’re always in demand.
- Prioritize scissors, knives, and compact tools over bulky loud weapons.
Upgrade Essentials
- Cooking Area: Unlock medium/large meals.
- Dismantling Station: Boost material flow.
- Medical Area: Reduce crafting cost of Medkits at Level 3.
Tools to Bring
- Carry lockpicks and bolt cutters for bigger areas with locked doors.
- Avoid hoarding water—balance your production with material usage.
Late Game & Escape Plan Execution
Survivor Optimization
- Replace early survivors with better-skilled recruits.
- Prioritize crafting and combat efficiency.
Guns Become Viable
- Bring a mix: 1 loud, 1 medium, and 1–2 stealth weapons.
- Pistols are effective when used wisely and can avoid large fights.
Sound Awareness with Guns
Gunfire alerts:
- Entire current room.
- Adjacent rooms if doors are open.
- Nearby rooms if zombies are close to closed doors.
Avoiding Patrol Hordes
- Triggered zombies don’t mean game over.
- Use run + sneak + stairs to de-aggro and reposition.
Ammo & Medkit Management
- Keep a healthy stock of ammo and Medkits.
- Don’t wait until you’re wounded or surrounded to realize you’re low.
Notes:
Good Cook Skill Bug
- Meat Dish benefits from Good Cook: +1 portion.
- Veg Dish oddly gives fewer portions with Good Cook. Use other survivors to cook this dish.
Master the Apocalypse
- With the right strategies and careful planning, Into the Dead: Our Darkest Days transforms from a chaotic scramble into a calculated survival challenge. Penny’s guidance, smart resource allocation, and stealth tactics will get you to the endgame—and out alive.
Stay quiet, stay sharp, and don’t forget to breathe.